How Sigma Cap Pro Works
Master the modular pod system and build any capacitor configuration in minutes
Assembly Video
Watch how quickly and easily Sigma Cap Pro pods snap together
Key Assembly Points
- Quick-connect terminals - Simply align and press pods together
- Secure fit - Terminals click into place for a permanent connection
- 120-degree rotation - For dual capacitor configurations
- No tools required - Hand assembly only
- One-time assembly - Designed for permanent installation
View Video Transcript
The Sigma Cap Pro system uses a patented modular design that allows HVAC technicians to build custom capacitor configurations on-site.
To assemble: First, select your main pod based on the hermetic compressor requirements. The main pod forms the base of your assembly and includes the primary terminal connections.
Next, add secondary pods to reach your target MFD values. For parallel configurations, stack pods without rotation. For dual capacitor setups, rotate the fan motor pod 120 degrees to separate the circuits.
The quick-connect terminals ensure a secure electrical connection that won't come loose during operation. Once assembled, the unit is ready for permanent installation.
Understanding the Pods
Three pod types cover virtually any capacitor requirement
Main and Big Pods
Small Pods
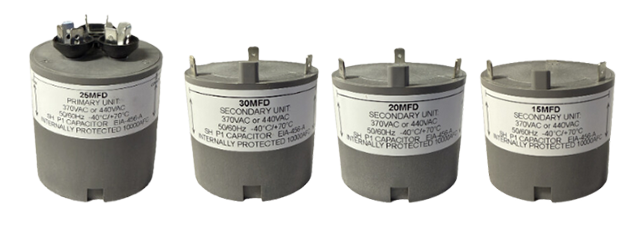
Main Pods
The foundation of every Sigma Cap Pro assembly. Main pods include dual MFD values for hermetic compressor configurations.
- 25/5 MFD or 25/7.5 MFD
- 2.63" body height
- 2.5" diameter
- Dual 370/440 VAC
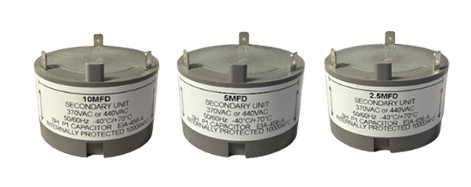
Small Pods
Fine-tune your capacitance with smaller increment pods. Ideal for reaching exact MFD values.
- 2.5 MFD, 5 MFD, or 10 MFD
- 1.938" body height
- 2.5" diameter
- Dual 370/440 VAC
Big Pods
Add larger capacitance values quickly. Use for high-demand compressor or fan motor applications.
- 15 MFD, 20 MFD, or 30 MFD
- 2.1" body height
- 2.5" diameter
- Dual 370/440 VAC
Pod Specifications
| Pod Type | MFD Values | Body Height | Diameter | Voltage |
|---|---|---|---|---|
| Main Pod | 25/5, 25/7.5 | 2.63" | 2.5" | 370/440 VAC |
| Small Pod | 2.5, 5, 10 | 1.938" | 2.5" | 370/440 VAC |
| Big Pod | 15, 20, 30 | 2.1" | 2.5" | 370/440 VAC |
Assembly Rules & Alignment
Follow these guidelines for proper capacitor configuration
Sigma Cap Pro pods are designed for one-time, permanent assembly. Once connected, pods should not be separated. Plan your configuration before assembly.
Compressor-First Stacking Rule
When building a dual capacitor, always start with the hermetic compressor (HERM) pods at the bottom, then add fan motor pods on top.
Order: Main Pod (HERM) → Additional HERM Pods → Fan Pods (rotated)
120-Degree Rotation for Dual Configs
For dual capacitor configurations, rotate the fan motor pod 120 degrees from the hermetic pods. This separates the circuits using the pass-through terminal design.
Parallel: No rotation needed
Dual: Rotate fan pod 120°
Parallel Configuration
Pods stacked without rotation for single circuit (parallel connection)
Dual Configuration
Fan pod rotated 120° for separate hermetic and fan circuits
Protective End Cap
Use the protective end cap on the top of your assembly to cover unused terminals and provide additional protection during installation and operation.
- Covers exposed quick-connect terminals
- Protects against accidental contact
- Snaps securely into place
Step-by-Step Assembly
Follow these steps to build your capacitor
Determine Requirements
Use the calculator to identify the pods needed for your hermetic and fan MFD values.
Select Main Pod
Choose the main pod (25/5 or 25/7.5) that best matches your hermetic compressor needs.
Stack Secondary Pods
Add small or big pods to reach target values. Rotate 120° for dual configurations.
Install & Connect
Add end cap if needed, then wire the assembled unit following standard HVAC practices.
Ready to Build Your Capacitor?
Enter your hermetic and fan values to see exactly which pods you need.
Use the Calculator